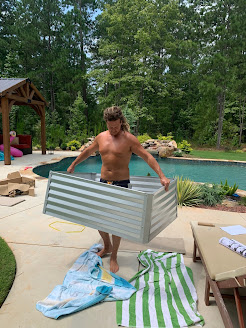
EEK! So exciting! Our #SUBPOD Composting Kit was delivered this week!
Meet Subpod - The growth hub for your garden that turns food waste into living soil with no smells or mess.
Subpod is a simple way to compost your food waste and grow new nutrient-dense foods in your own space. They have taken the hard work out of composting! Flat-packed for easy worldwide shipping (mine came from Australia), and easily assembled.
We are located in Georgia, United States. We do not have a garbage disposal, so I was excited to have a way to dispose of food waste and organic matter. It's also a great way to reduce one's footprint on the planet and also use to make killer fertilizer! We are hoping to harvest some nutrient rich soil in a few weeks to use as fertilizer around our property and also use the #Subpod hub for a raised bed garden.
Here is a Fast-forward look of the installation Process:
The Subpod Kit Arrives
Assembly: Unpack & Unfold
Unpack your Subpod from the box, then simply fold out the 4 panels from the base and push firmly until you hear the click at each corner.
Click lid On
Align the hinges with the lid sockets and press firmly to click them into place. Look from the inside and make sure the hinge has locked in.
Stand Hinges Upwards
Make sure the 3 hinges on the rear wall of the Subpod are all standing upwards.
Insert Divider.
Slot the internal divider panel as shown into the guides, which are located inside the Subpod in the middle. Be sure to push divider in all the way.
Attaching the Support Hinge.
Lean the lid against a wall to hold it upright or use a friend! Then, follow these 3 Steps:
1. Screw the axle bolt into the divider, 3rd hole from the rear on top row. Look for a yellow sticker.
2. Insert 1 bolt and attach the hinge and nut. Repeat for second one.
3. Pull Hooks to release Hinge.
PRO TIPS:
If you find you prefer a video guide, we found the Subpod Youtube installation videos helpful.
Now you are ready to Assemble the Subpod Grow Garden Bed.
Our Subpod Hub Kit also came with a galvanized perimeter that creates the Garden Bed.
You can get your garden bed setup and ready for your Subpod by visiting www.subpod.com/start for more info and tips.
Start with a long wall (longer Panels). Using the bolts and nuts, attach 2 corner brackets to both ends of a long wall piece, then lean it against a wall or chair.
Attach short walls. Attach the 2 x short wall pieces. This helps it stand upright, allowing you to attach the final long wall.
PRO TIP: This part was easier to assemble after watching the Subpod YouTube video:
*We also bought sand and pavers to create a level, hard surface to install the Grow Garden Bed.
You may Need:
-6 Bags of Play Sand
-12 , 12x 12 pavers
-7+ Large bags of potting/gardening soil
Subpod Installation Complete!
Now it's time to order my worms! That's right..... You can order Worms in the mail!! Subpod recommends 2000 worms to get started. Red worms or Red Wigglers are the most recommended for composting. Here is the Link I used to order worms:
Stay tuned for the second video that shows my worms getting delivered and Feeding my Subpod!
To order your own Subpod Kit, go to
Order Your Subpod and Enter this Code for 10% Off:
GOSUBPOD10
Thanks so much for joining and following our Composting Adventures!
I am hoping the whole family can join in on the fun and learn how to better serve our planet.
If you have any questions, Please let me know!
~Kasey


Comments
Post a Comment